Storyboards before the video: I see the whole cut early — and fix the script while it's cheap
The cheapest place to fix a clip is while it isn't a clip yet. I didn't get that before: I pushed an idea almost straight into video. I'd generate a minute of expensive video — and only there would I see that the scene doesn't read. Then a redo, time, money. Now there's one more layer between the scriptwriter and the video model: the storyboard. That's what changed everything.
In the first part I was choosing a scriptwriter — an LLM call that turns a one-line idea into a shot list for every scene. In the second — the video model that brings that shot list to life. Between them there was a gap: the scriptwriter hands over text, the video model immediately draws the final video, and I never see the whole high-level cut — only separate frame descriptions. The storyboard closed that gap.
What this layer is
A storyboard is a pencil board built from the shot list: the same scenes, but drawn. Not the final video — a quick black-and-white sketch of what's in frame, who's talking, where it's moving. One picture for the whole clip. I look at it and, for the first time, see my idea as a whole, before I've spent a single second of video generation.
Sounds like a small thing. In practice it's the difference between "I hope it works" and "I can see that it works."
How it evolved
It didn't work like this right away. The storyboard went through four stages, and each one added what I'd been missing to actually "see" the clip.
Stage 1. Key frames only
At first I asked for one frame per scene — the opening pose. I got tidy pictures and understood almost nothing. There's a character, but no motion. Where it's going, what it's doing, how the scene ends — unclear.
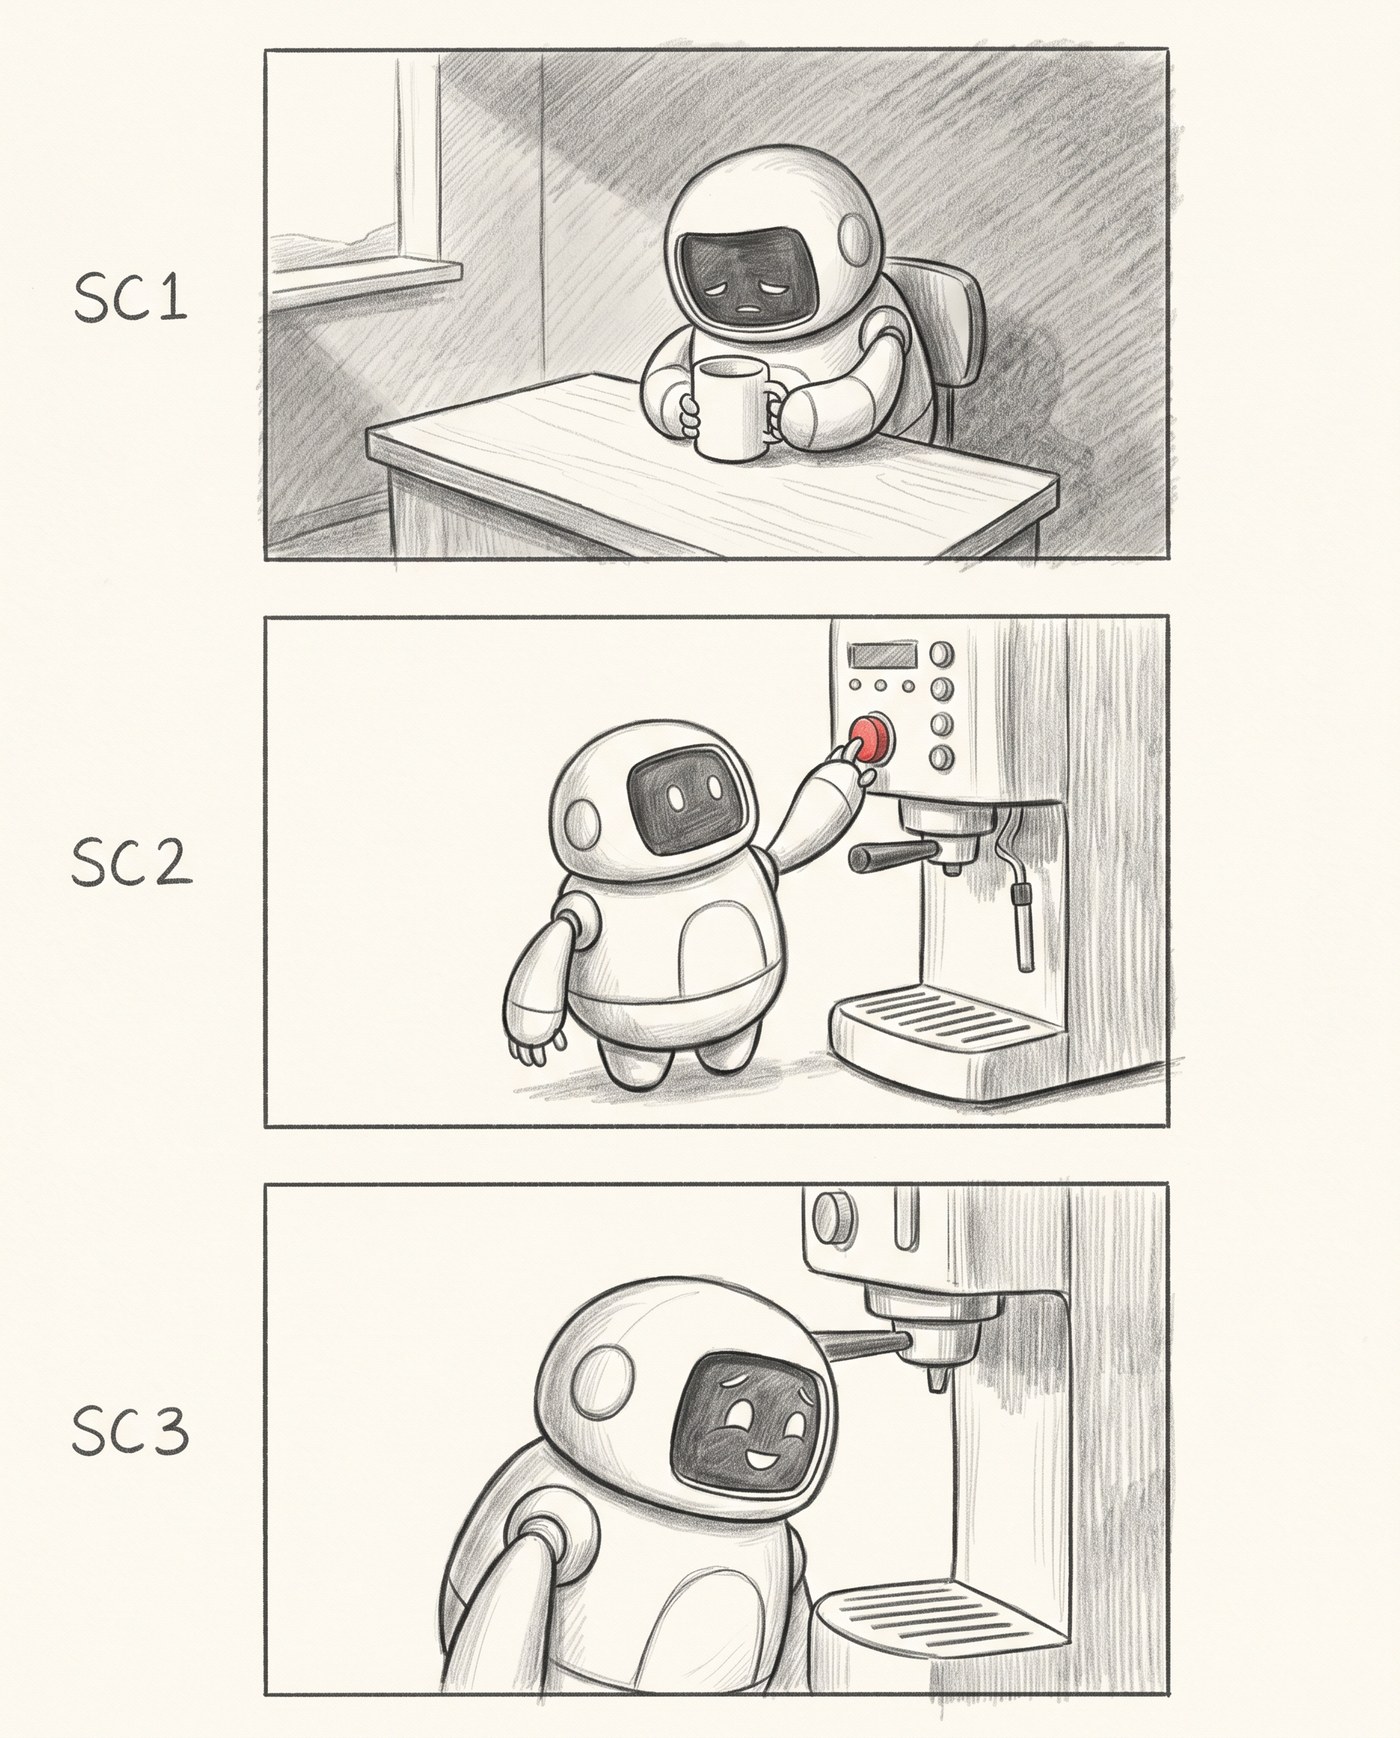
Three scenes, one frame each. You see the character and the setting, but not the rhythm of the clip.
Stage 2. Motion: START → PEAK
So I split each scene into two frames — the start (START) and the peak (PEAK) — and put an arrow between them. Motion started to read immediately: robot sits → robot peers into the mug. I left the balloons empty for now, as placeholders: you can already see where the line goes, there's just no text yet.
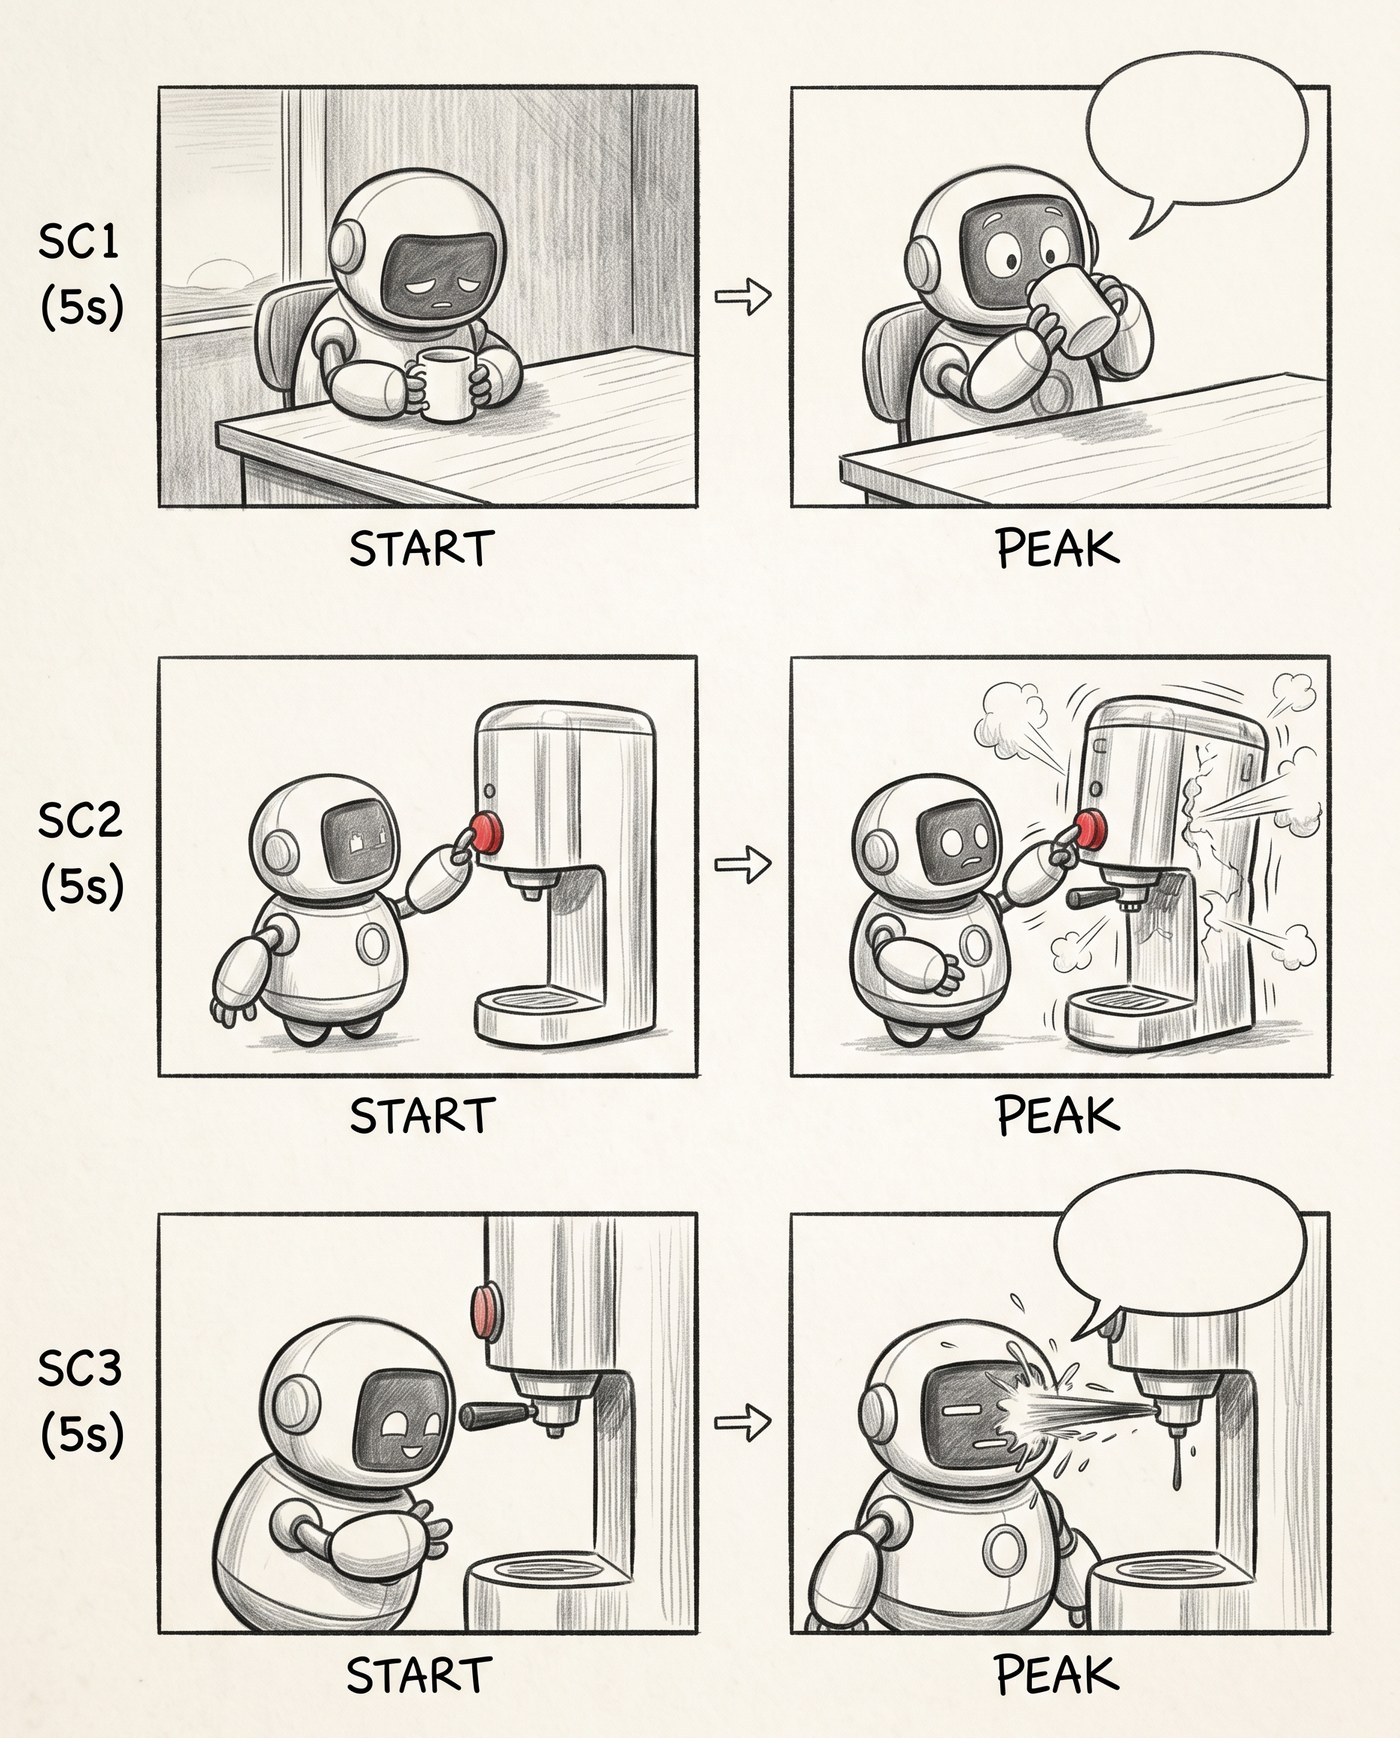
Motion appeared inside the scene. The empty balloons mark where the lines go.
Stage 3. Lines in place
Next I asked it to write in the exact lines — the ones the scriptwriter produced. «Empty... again?!», the narrator caption «It had waited all night for this.», the final «...worth it.». And that's when the clip first played in my head: I read the board left to right, top to bottom, and run the whole scene with its dialogue. A flat line or a sagging beat is now something you see, not something you guess.
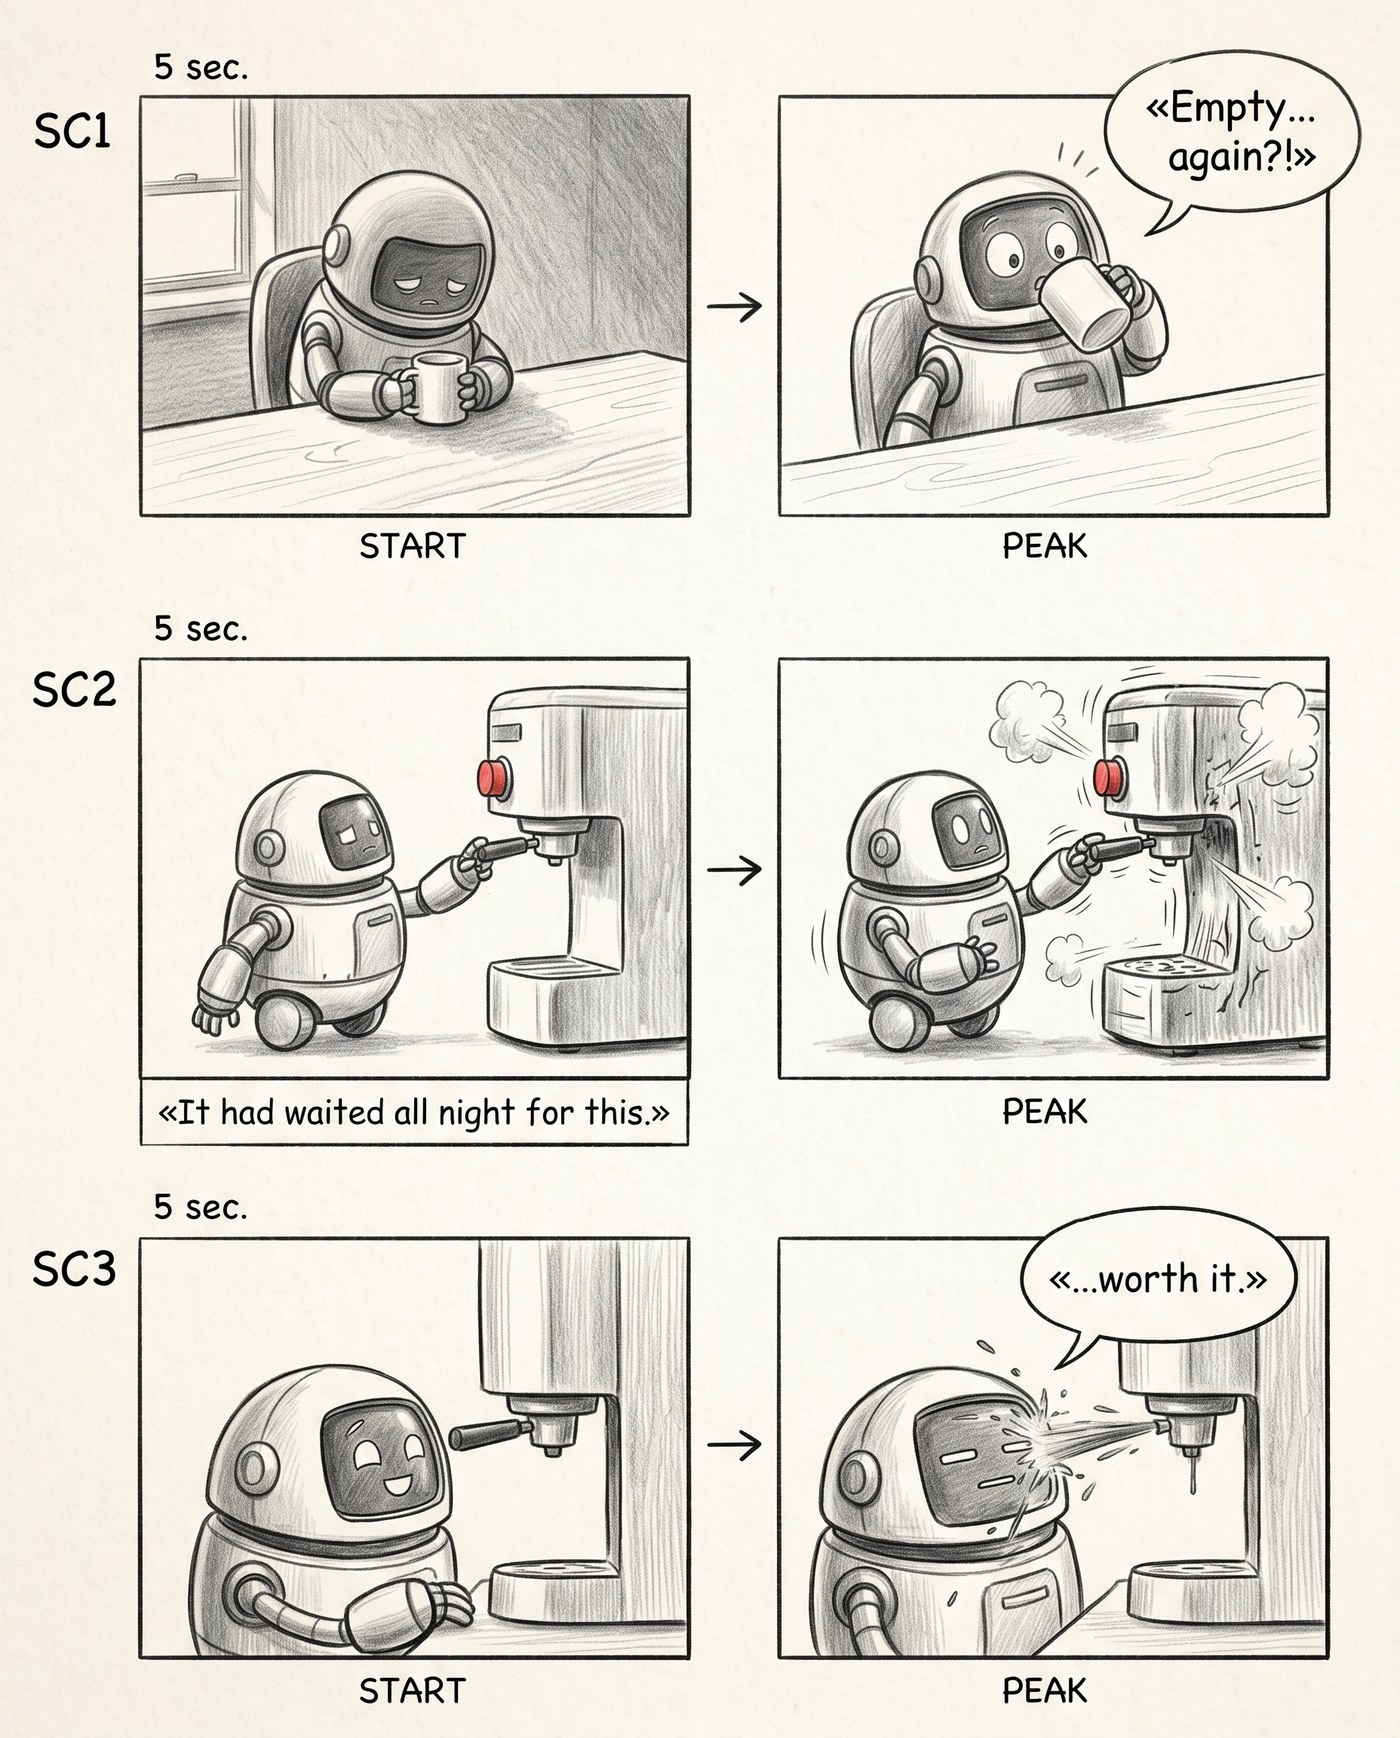
Lines from the shot list, in place. The clip reads as a whole — with sound in your head.
Stage 4. Casting
The last thing missing was controllable casting. One character is fine, but the moment there are two in frame, the model starts mixing them up: the cat is ginger, then grey, then someone else entirely. I added a second character to the prompt and a narrow CASTING strip on the right — mini portraits of the characters. And to keep them from drifting frame to frame, I gave the model reference images as input:
The casting input: two references. The model holds the characters' appearance across every frame from them.
The result is a board where the robot and the cat stay recognizable from the first frame to the last, with a "cast" hanging off to the side, like a real pre-production storyboard.

Two characters, both stable across frames, and the CASTING strip on the right.
Why I do this
I now see the whole high-level cut before video generation. And that buys one thing, but a big one: I fix the script while it's cheap.
What I catch on the board:
- an empty beat — there's a scene, but nothing happens inside it;
- the wrong line — the text is flat, or the wrong character is speaking;
- a lost character — someone dropped out of frame at the most important moment;
- broken casting — a character "drifted" in looks.
Any of those, on finished video, I'd be fixing by regenerating — that's time and money. On the board I change a line in the shot list and rebuild the picture for pennies. It's my cheap preview of the whole clip, and the point where the script is still soft.
The prompts
The whole board rests on a single prompt to the image model. Here's the base — the no-cast variant, one character (I added line breaks for readability; the prompt text is verbatim):
Hand-drawn graphite pencil storyboard, monochrome grayscale,
professional film pre-production look, soft pencil shading on
off-white paper. NO color.

Draw a speech balloon or a narrator caption box ONLY on panels
explicitly marked below; where text is specified, render that EXACT
text accurately and legibly. A speech balloon is rounded with a tail
to a character; a narrator caption box is a plain rectangle along the
panel bottom, never attached to a character.

LAYOUT: 3 horizontal rows stacked top-to-bottom, ONE ROW PER SCENE.
Put ONLY the scene number (SC1, SC2, …) in the left margin of each row.
Inside each row draw the panels left-to-right at equal size, with a
small hand-drawn arrow pointing from each panel to the next so the
motion reads as a left-to-right progression. Beneath each panel write
its phase word EXACTLY ONCE: only START under the left panel and PEAK
under the right panel. Do NOT write any other words, numbers or labels
on or inside the panels. Keep every character visually consistent
across all panels.

SC1 (5s): START — a small round robot sits slumped at a wooden desk at
dawn, holding an empty white mug, its screen-face dim; PEAK — it lifts
the mug and peers inside, two wide surprised eyes lighting up. On the
PEAK panel draw a speech balloon with a tail to the character: «Empty...
again?!».

SC2 (5s): START — the robot rolls up to a tall chrome coffee machine,
reaching for a big red button; PEAK — it jabs the button, the machine
shudders and rattles, steam bursting from its seams. On the START panel
draw a narrator caption box along the bottom edge (a plain rectangle,
not a speech balloon): «It had waited all night for this.».

SC3 (5s): START — the robot leans in close to the machine's spout,
screen-face hopeful; PEAK — a jet of coffee sprays it full in the face,
its screen-face freezing into a flat line. On the PEAK panel draw a
speech balloon with a tail to the character: «...worth it.».
What does the work here:
- grayscale and "NO color" — this is a pre-production sketch, color only gets in the way;
- LAYOUT — it pins the grid hard: a row per scene, two panels, an arrow, START/PEAK labels and no other writing;
- balloon vs caption box — a character's line is drawn as a bubble with a tail, off-screen narration as a box along the bottom; the model shouldn't confuse the two;
- exact text in guillemets — I ask for the lines verbatim, in guillemets, so I can later check them against the shot list by eye.
To add a second character, I appended casting to the same prompt. In the header — that there are now two characters and both have to stay recognizable. Into each scene I added the cat's actions: asleep on the desk, trotting alongside, sitting and watching. And on the right — the CASTING strip with references:
There are two recurring characters, a small round robot and a fluffy
cat; keep BOTH visually consistent across every panel.

On the right edge, a narrow vertical CASTING strip separated by a thin
line, with a small reference headshot of each main character drawn in
the same graphite pencil style; use the attached reference images for
the characters' appearance.
Now — what different models make of this.
Bonus: what to draw the board with
I ran the same board through four image models, in two prompt variants: no-cast (one robot) and with-cast (robot, cat and the CASTING strip). The requirements are identical for all of them — grayscale, exact lines, the START→PEAK grid. I looked at four things: does the model follow instructions (grayscale, narrative), does it hold the exact text, does the casting drift between frames, and how alive the drawing is.
No-cast: one character
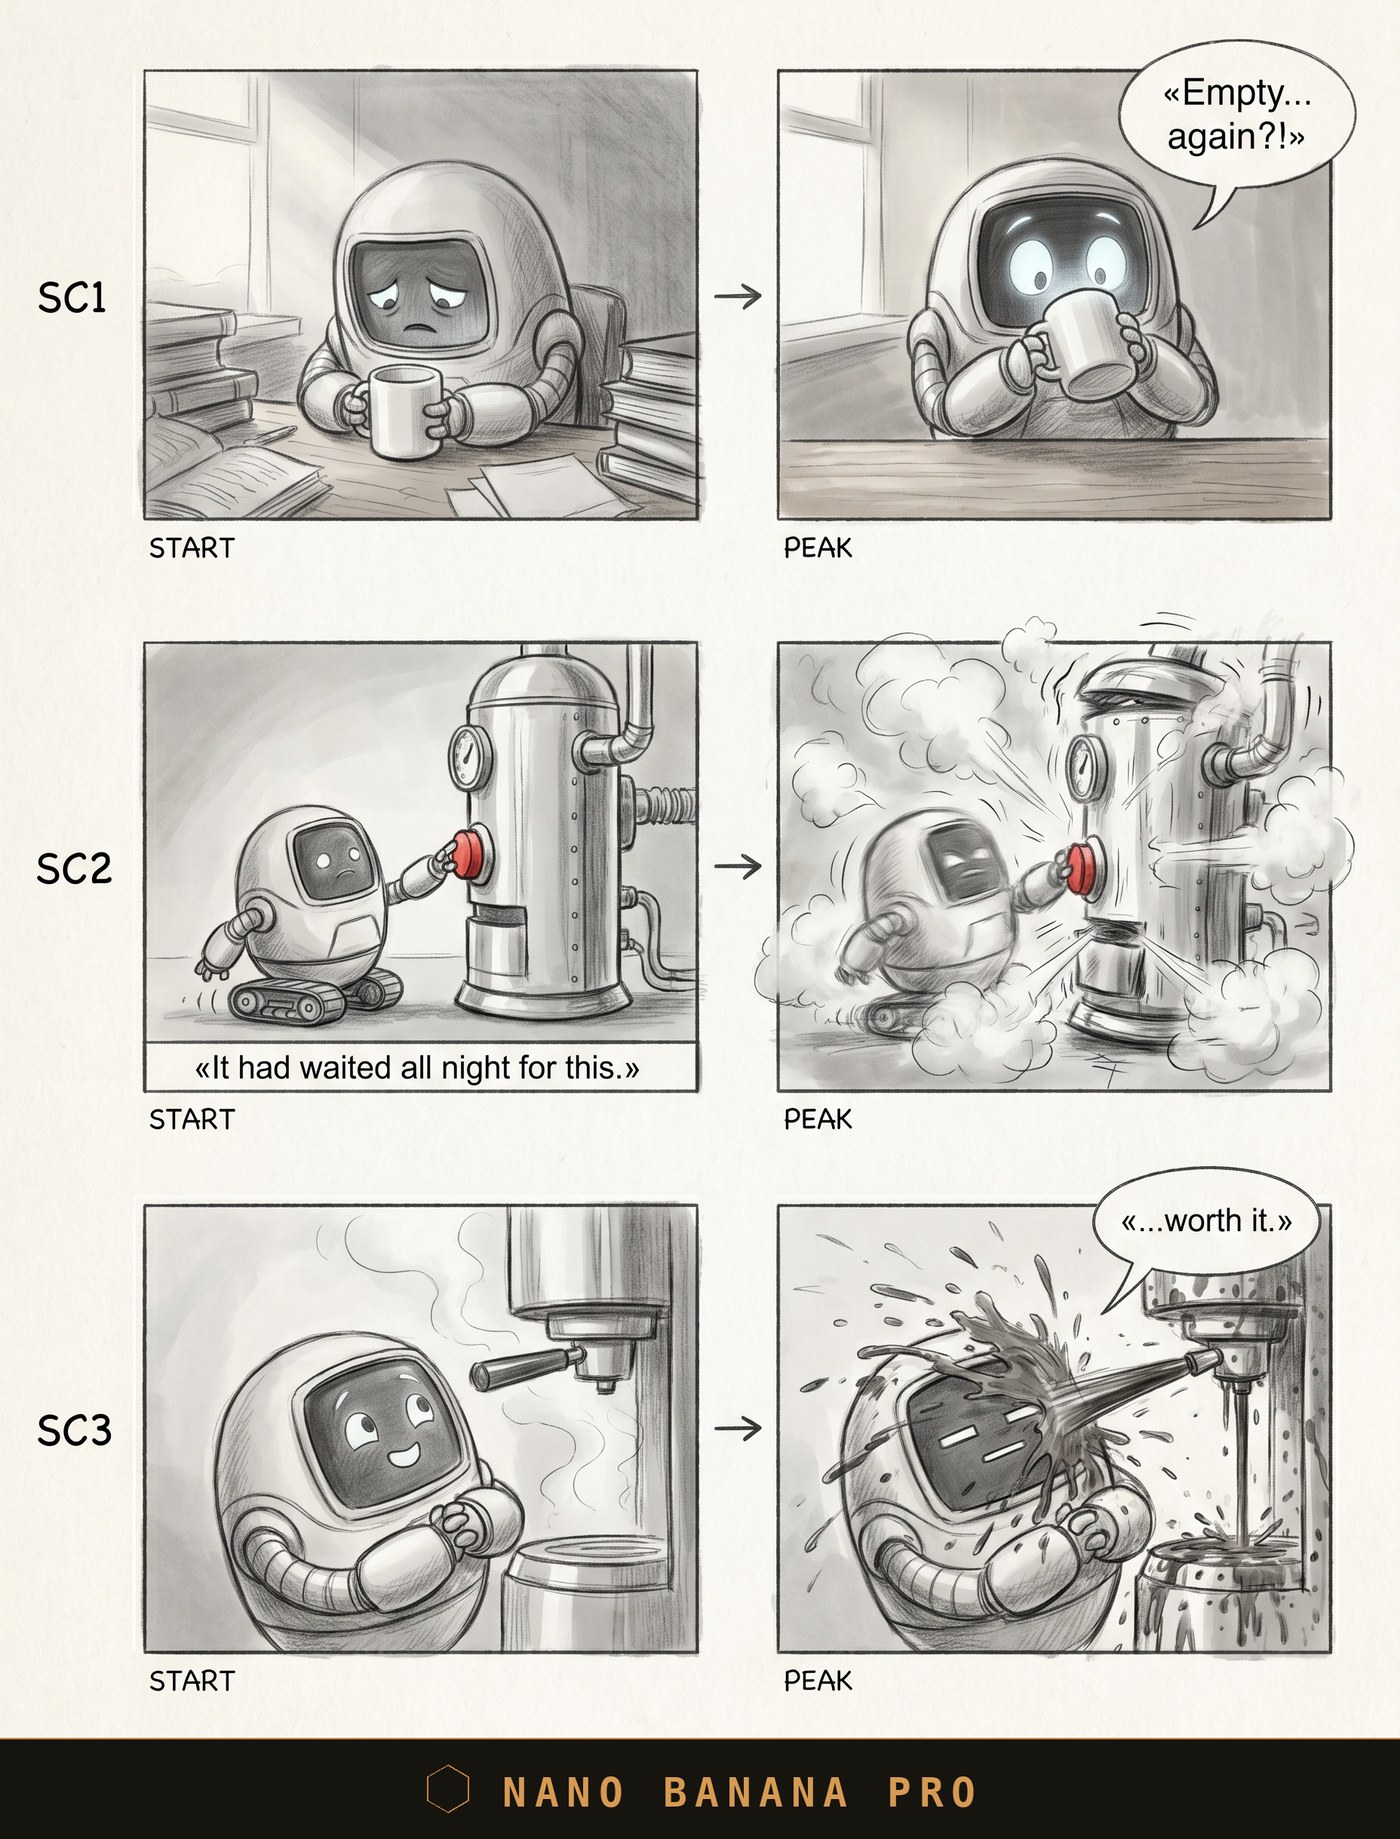
Nano Banana Pro: clean grid, motion reads, text in place.

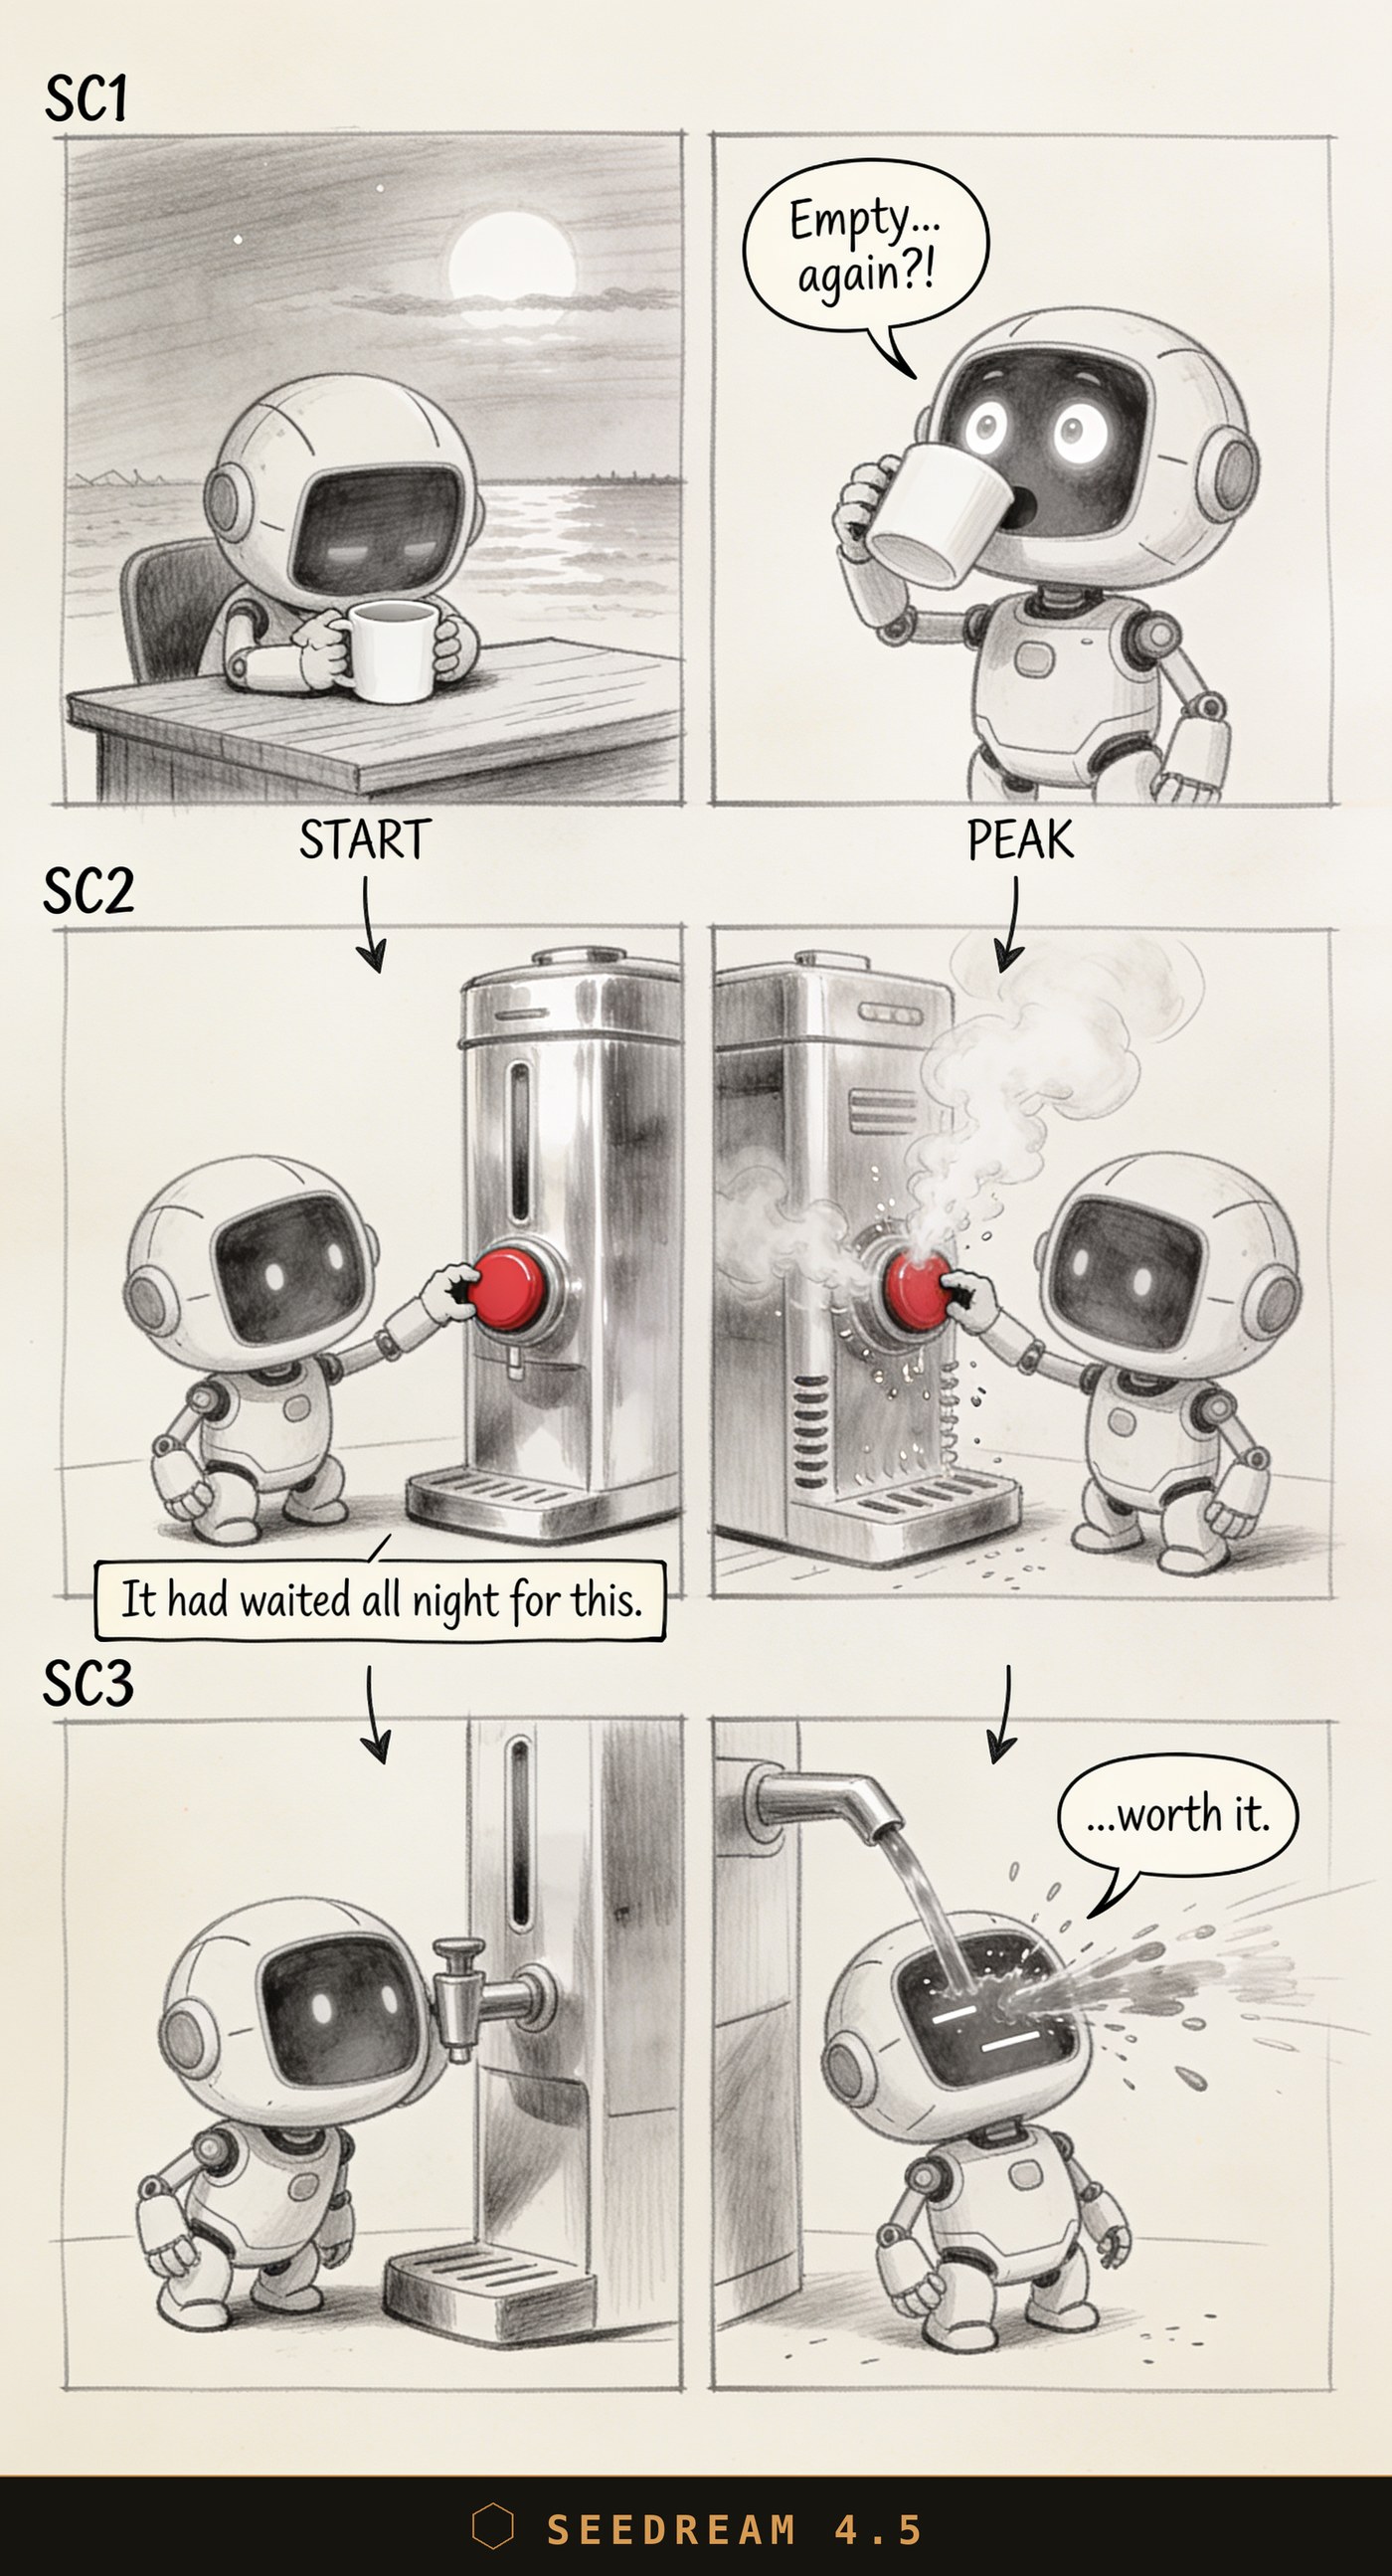
GPT Image 2: the richest artwork — pencil texture, background, detail. Only the lines come without guillemets.
Seedream 4.5: the drawing is nice, but the button is red. The prompt asked for grayscale and "NO color" — the model broke that.
With-cast: robot and cat
This is harder: two characters that have to stay identical across every frame, plus the CASTING strip drawn from the references.
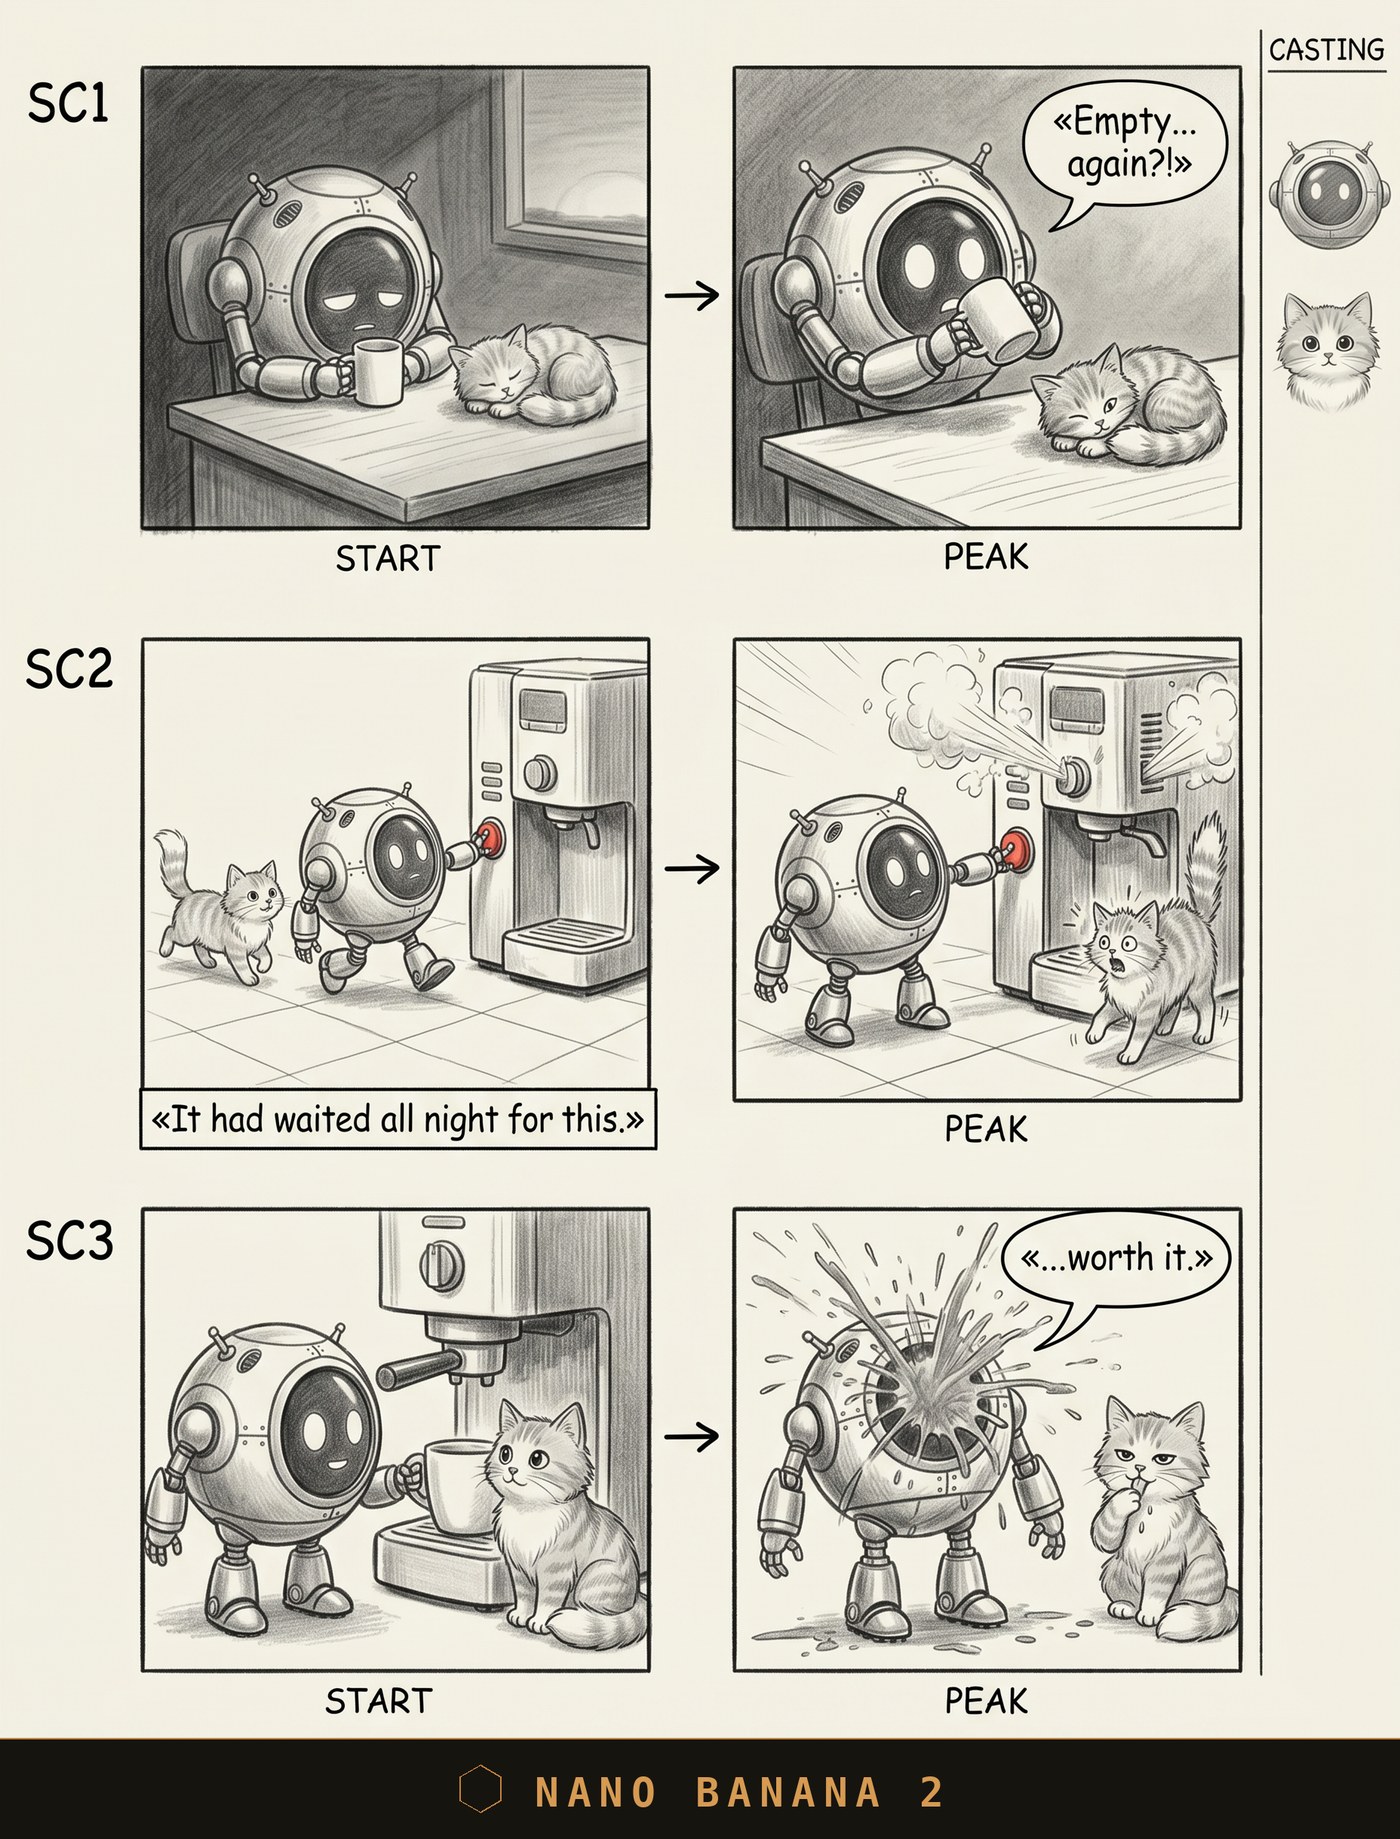
Nano Banana 2: both characters stable, casting in place, lines verbatim with guillemets. This is the model I'm working on right now.
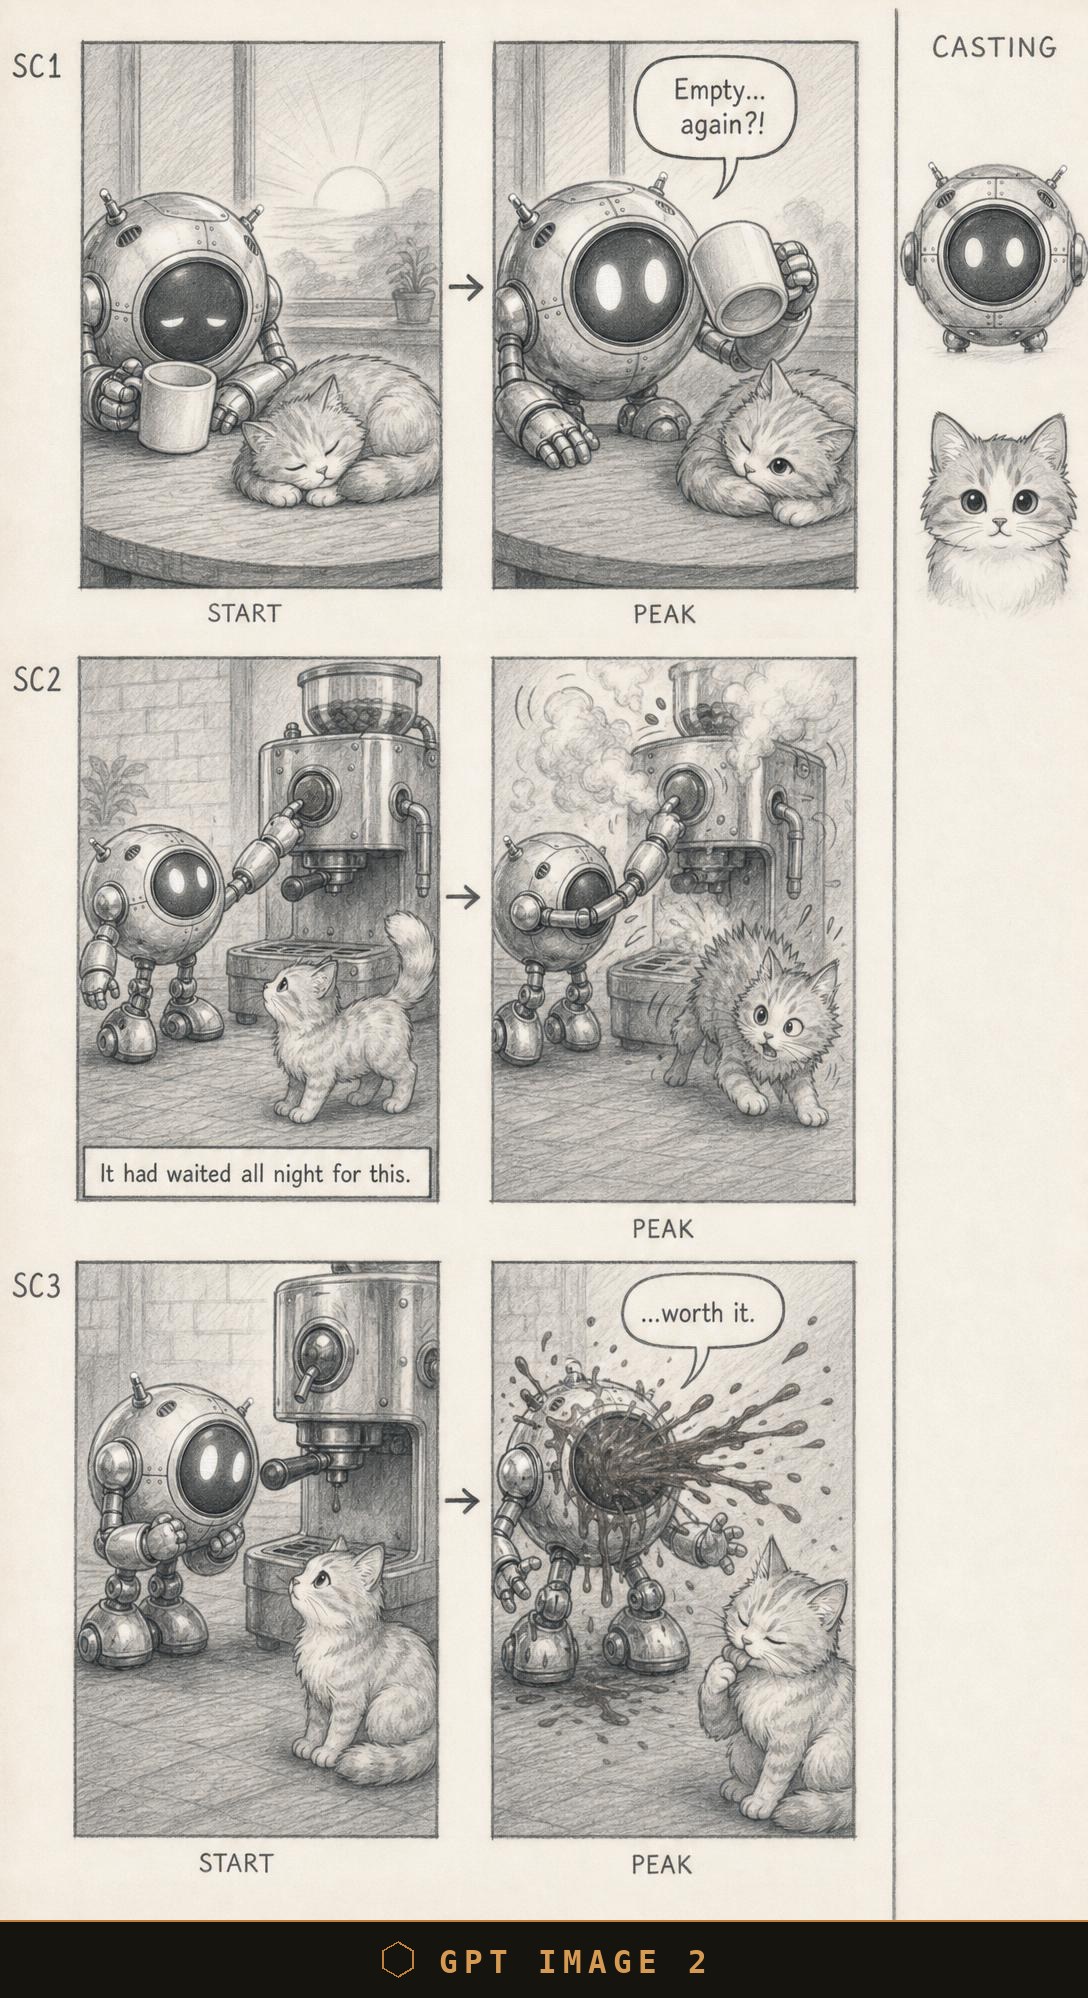
GPT Image 2: the best detail of the lot — but again the lines come without guillemets, and the frame is noticeably denser.
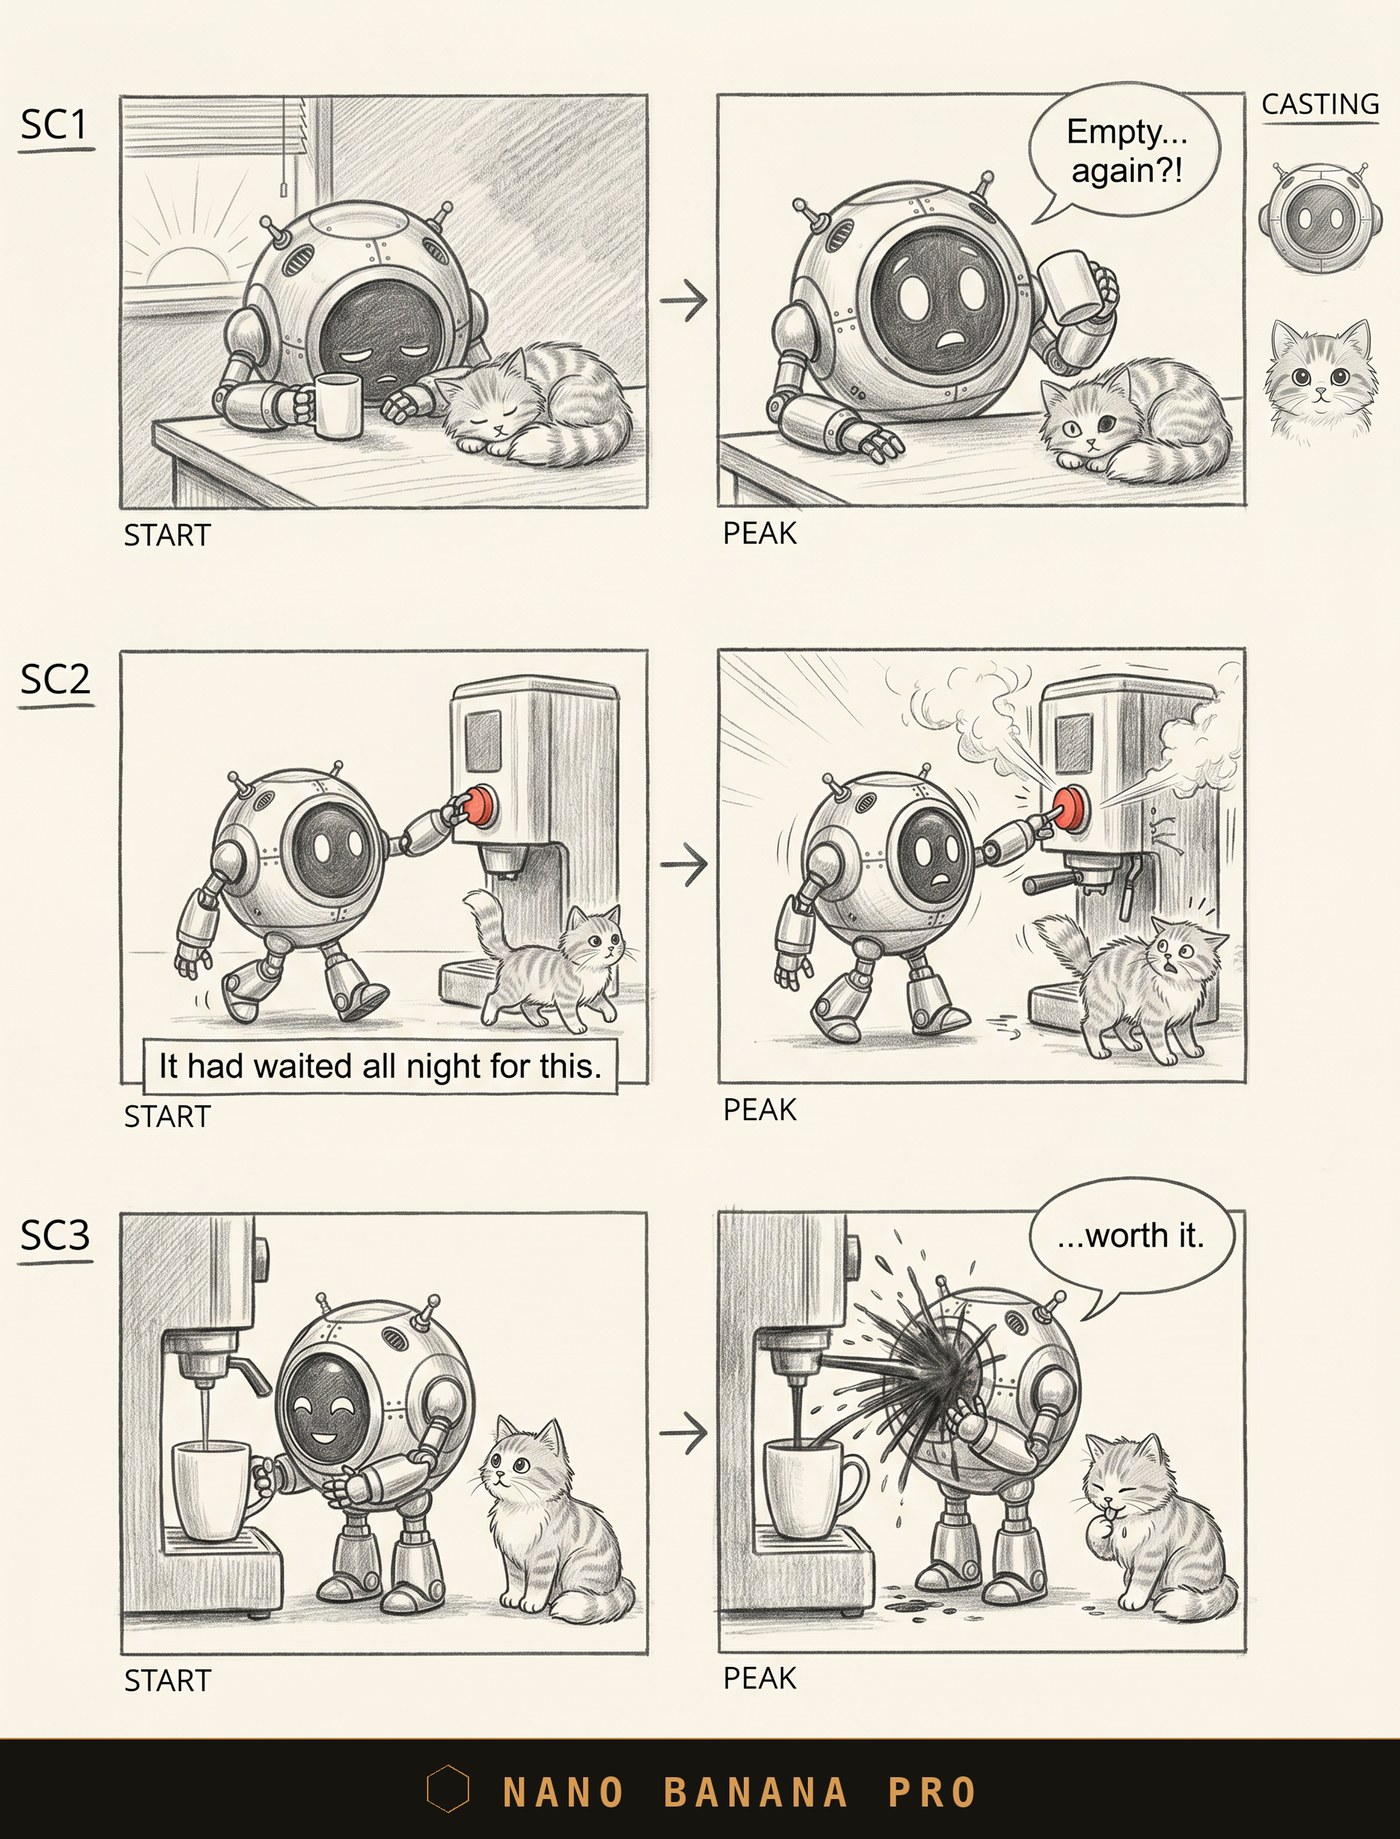
Nano Banana Pro: clean and tidy, casting holds. In my experience — slower and pricier than the rest.
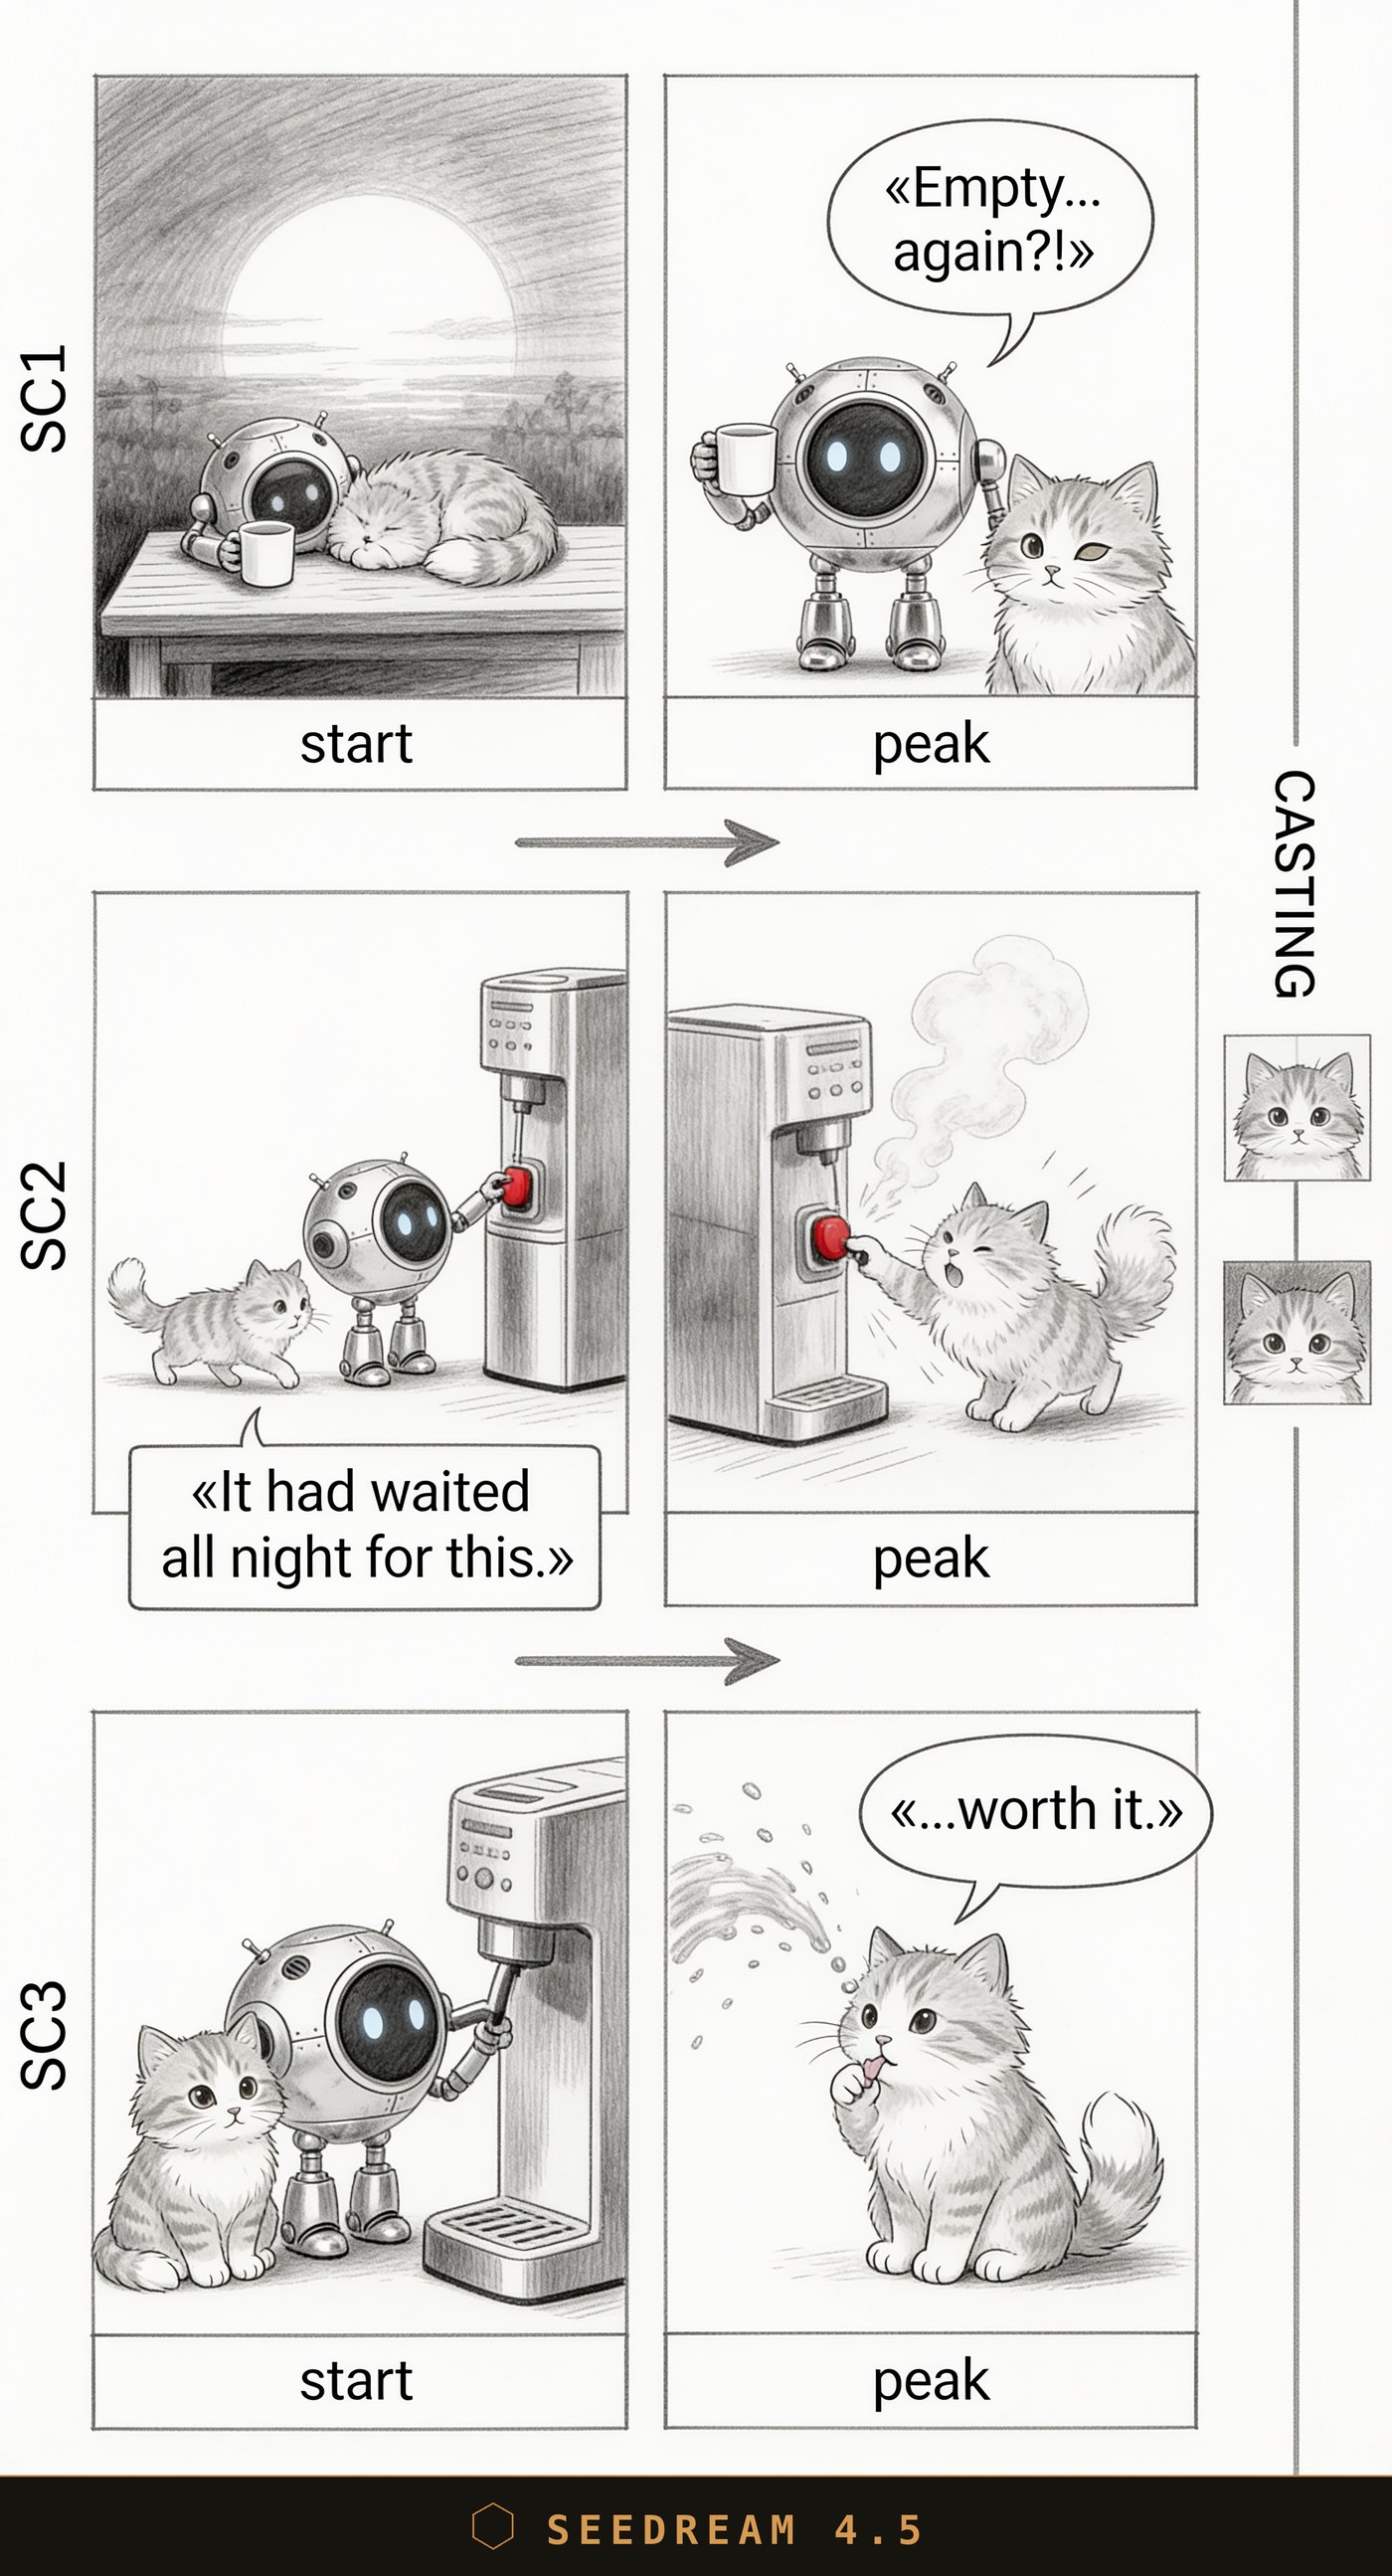
Seedream 4.5: and here's the critical error. In the final frame the robot is simply gone, and its line «...worth it.» went to the cat. The joke about the coffee-soaked robot is broken — the lead isn't in the punchline.
Short verdict
| Model | Strong | Weak | Where it sits for me |
|---|---|---|---|
| Nano Banana 2 | Stable casting, verbatim text with guillemets, clean board | — | My working choice right now |
| GPT Image 2 | Best detail and texture | Lines without guillemets, denser frame | I'll recommend it if it comes out cheaper than Nano Banana 2 |
| Nano Banana Pro | Clean, casting holds | Slower and pricier in my experience | Backup, when I don't mind the wait |
| Seedream 4.5 | Pleasant "sketchy" style | Critical errors: red button instead of grayscale, loses a character and hands the line to the wrong one | Out — the errors break the scene |
The conclusion is simple. For a storyboard, what matters most to me is that the model just does what it's told: holds grayscale, the exact text and the casting. By that measure Nano Banana 2 is in production for me right now — it doesn't fail on the things that matter. GPT Image 2 draws the prettiest of all, and if it turns out cheaper, I'll recommend it for the detail. Nano Banana Pro is a solid backup, but slower and pricier. Seedream 4.5 I've set aside: the style is pleasant, but critical errors in the scene cost me more than looks.
How it turned out
I checked the board, fixed a couple of lines in the script — and handed the scene to the video model. The same Seedance 2.0 I settled on in the second part. Here's the result: the same robot, the same cat, the same beats — only now in color and with sound.
From a grey pencil plan to a finished frame. I'd signed off on the script back at the storyboard — the video model just had to draw it.
Where this fits in the series
A chain has come together. In the first part I chose a scriptwriter — it sets the ceiling on text quality. In the second — the video model, which executes it. The storyboard slots in between: the layer where I finally see the whole clip early and can fix it while the fix costs pennies. I used to trust the pipeline blind. Now I look, and I decide.